Wednesday, February 23, 2011

Transposing Music

There are several reasons to transpose the key of a song, the original key may be out of your singing range, or you don’t know the chords.  I’ve provided a chart of some of the most common keys and the chords within those keys. 
IiiiiiIVVviviio
ABmC#mDEF#mG#dim
BC#mD#mEF#G#mA#dim
CDmEmFGAmBdim
DEmF#mGABmC#dim
FGmAmBbCDmEdim
GAmBmCDEmF#dim
Here’s how to use the grid.  Let’s suppose you have a song in the key of  ”G” like Viva la Vida by Coldplay. Here’s your first line.
Em            C            D
I used to rule the world
                        G                                   Em
Seas would rise when I gave the word

So you’ve got Em, C, D, G, and then back to Em and repeat.  That would be vi, IV, V, I.  So if you want to move it to the key of “F” just find vi, IV, V, I in the key of F which would be Dm, Bb, C, F.  It’s almost the sensitive female chord progression.
Once you’ve figured out the Roman numerals with the grid you can transpose into any key.  Learning to think in Roman numerals is a good tool to have for a guitarist, but since this is a beginner lesson, I won’t go too much into why.  You can just use the chart and see that it works without having to worry too much about the mechanics of it.
Of course you can always use a capo to transpose a song, but that only works if you want to transpose a song higher.  You can transpose to a lower key with a capo, but you’ll have to change your chord shapes and then you’re back where you started, figuring out I IV V in your new key.
By the way, I can’t embed the YouTube video of the song because Warner Music Group forbids legions of people promoting their music all over the net for free.  For some reason the record companies are still confused why it is that nobody is buying and everybody hates them.


written by project-d
http://dproject.info/blog/index.php/songwriting/free-guitar-chords-for-beginners-how-to-transpose-the-key-of-a-song/


Nifty Guitar Tools


Guitar Videos:


A Metronome:


A chord finder:


A tuner:


www.howtotuneaguitar.org

Relative Major and Minor

Introduction
We'll be working in the key of C, since it's the simplest key for me. And, since I love acoustic rock, the progressions in this lesson will have that acoustic rock feel.

To begin, I'll tell you what a relative minor key is:

A relative minor key of any major key is the minor key that has the same key signature as the major. For example, C Major's relative minor is A minor, since they both have no sharps or flats.

Luckily for us, we don't have to figure out key signatures, because:

The root of the relative minor key is the 6th scale degree of the major key. A is the 6th of C, A is the relative minor of C. E is the 6th of G, E is the relative minor of G.


As a point of notation, when I give a chord progression, say, I-IV-V, I mean that you should return to the I and just keep playing the same progression (or end on the I if you're done). Other people would call this a I-IV-V-I progression, but my progressions will just keep going around in circles anyway.

Using The Relative Minor Chord In A Chord Progression
Now that we know what it is, let's try to use it. If you've done any reading on chord progressions, you'll be familiar with the I-IV-V progression that is oh so familiar in music. For now, let's keep I-IV-V as our theme, and do some variations on that theme using the relative minor.

The first variation we're going to use is I-vi-IV-V. Here, we're using the relative minor as a quick interruption to the major progression. In the key of C, these chords are:

C -> Am -> F -> G

Notice how C and A sound like they mix when you're in this progression, and also notice how, once you're out of A and into the F chord, the progression sounds a bit different from the C -> F -> G. That little bit of minor takes the entire thing in a new direction. Musically speaking, this is because the iv scale degree is an embellishment to the progression and adds a bit of character, but doesn't fundamentally change anything. In other words, while we're still fundamentally working with the I-IV-V progression, we added a touch of embellishment, making it sound different but not changing the function of the important chords.

A second way to use the relative minor chord is to let the V chord play with it a bit. A simple progression that lets you do this is: I-IV-V-iv-V. Notice how, here, we had to go back to the V before we were done. This is because iv doesn't really lead into I as well as V does (musically, V creates tension, which is resolved by going back to I. iv does not). In this progression, the iv chord (remember, our relative minor chord) acts to make the progression last longer. In the key of C, the chords are:

C -> F -> G -> Am -> G

The last progression I'm going to show you will really make that resolution sing out.

It's almost the same as the one above, but now we're using an extra IV chord. This progression goes I-IV-V-iv-V-IV or, in the key of C:

C -> F -> G -> Am -> G -> F

Notice how going from G to Am doesn't do much for the tension we've built up to (it's still there, but Am doesn't increase or decrease it), and notice how it really sounds like this progression takes us home to C when we start it all over again. Contrast this to the simpler I-IV-V-IV progression and see the difference that the iv chord makes.

Just like before, it doesn't change the fundamental feeling of the progression, it just changes its character.

Making The Relative Minor Do Something More
Now, let's move away from just using the relative minor chord, and start using the relative minor *key*. We're going to move away from the I-IV-V progression for the next two things I'll show you.

First, we're going to explore the relative minor key to mix two chord progressions into one. Consider this: I-iv-ii-V or, in C major:

C -> Am -> Dm -> G

See how the Am seemed to lead into Dm which seemed to lead into G? How did that work? Well, considering only the two middle chords, Am->Dm, we see that this is actually a i-iv progression in the relative minor key, meaning that Am and Dm work together much in the same way that C and F do in C major. But that's not all. Am and Dm work together, but Dm leads into G. Musically, this is because the ii chord has much the same function as the IV chord. So, considering this progression, it has the same function as the very first progression I showed you, but uses the relative minor to entirely change the way it sounds.

Finally, we're going to embellish this a bit by working with the v chord in the relative minor to work with us in the major key. As a starting point, try this chord change:

C -> E

See how they seem to go into each other? This is I-iii, which works really well (and is also the beginning of David Bowie's "Major Tom", if you were wondering). Now, using C as an anchor, here is a really neat progression that brings together the major key and its relative minor:

C -> Am -> C -> Em -> C -> Am -> Dm -> G -> C

Do you see how heavily we were relying on C? This is because we are fundamentally in C major, not A minor. If we stray too far from C major by just going straight into an A minor chord progression, we'll get that lost feeling where our ear is trying to figure out which key we're in. Plus, the minor key doesn't really have a i-iv-v progression that does the same thing as the I-IV-V in the major progression (take a look at jslick07's excellent lessons on chord progressions to understand why). Try it! Do: C -> Am -> Dm -> Em Can you see how it doesn't *quite* work as well?

Final Thoughts
This was a basic introduction to playing around with the relative minor chord and the relative minor key. Your job now is to experiment with other chord combinations in this set and see what works and what doesn't.

Guide written by crono760
http://www.ultimate-guitar.com/lessons/chords/fun_with_the_relative_minor_key.html


What are Scales?

**What you can expect from this lesson**

If I’ve done it right, at the end of these notes you will know 3 things:
1. What a scale is.
2. How to play one scale on various positions of your fretboard.
3. What issues to consider if you want to extend your scales knowledge and practice.

**First, some definitions**

An interval is the space or distance between any 2 notes. Intervals can be described in various ways: a third, a tone, a step, and a fret are all terms that people use to talk about music intervals. In this lesson I will describe intervals by the number of frets involved.

An octave is the interval between 2 special notes. These notes will have the same sound and feel when you play them, even though they are not the same pitch.

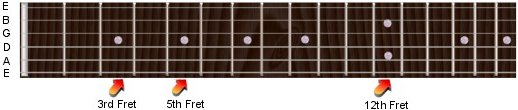
On a guitar, the octave notes are any pair of notes 12 frets apart. The simplest example of octave notes is when you play a string open (no left hand fretting) and then the same string at the 12th fret. (This fret is often dotted on the side of the fretboard to help you find and play it)

Play this set of notes:


(highest pitch string)
1 E |--0--12------------------------------------|
2 B |---------0--12-----------------------------|
3 G |----------------0--12----------------------|
4 D |-----------------------0--12---------------|
5 A |-----------------------------0--12---------|
6 E |------------------------------------0--12--|
(lowest pitch string)

The first two notes are both E notes. The E note at fret 12 is one octave higher than the open E note. On string 2 the open note is B, and the fret 12 note is also B, one octave higher. And so on.
(By the way, acoustically an octave is created by a 2:1 proportion of harmonics. Fret 12 of your guitar is midway between the two bridges of your guitar. Playing at fret 12 makes your string half the length of the open string, and thus raises the pitch one octave.)

Next, a scale is any set of notes that leads from one note to a second note an octave higher or lower. If you start at the low note and finish at the high note, you have played an ascending scale. And obviously, going from high to low creates a descending scale.

All of these examples are scales. Try them out.


eg1 |--0--12-----------------------------|

eg2 |--0--7--12--------------------------|

eg3 |--0--7--11--12----------------------|

eg4 |--12--7--0--------------------------|

eg5 |--0--2--4--6--8--10--12-------------|

eg6 |--12--11--10--9--8--7--6--5--4--3--2--1--0--|

Some points to remember. First, there is nothing in those examples to tell you which string to play. The scale is created not by particular notes but by the 12 fret gap, so you will play a valid scale whichever string you choose. So you should try the examples on different strings. If you listen carefully you will start to hear how the patterns are all the same, even though the pitch may be higher or lower.
Secondly, if you compare example 2 and example 4, you will see the notes played are the same. The only difference is the direction of the scale. So we have played the same scale in both examples. One is ascending, the other descending.

Try creating your own scales according to the above principles. Start with any open string, end on fret 12 of the same string, and in between play as few or many notes as you choose. Or start at fret 12 and play a descending scale, finishing with the open string.

A root note is the main note of the scale, and is usually the note you start and finish with. If you play these notes...


1 E |--0--12------------------------------------|

...your root note is probably E. And if you play these notes...

2 B |---------0--12-----------------------------|

...your root note is probably B. (I say probably because if you get as far as studying the different modes of a scale, you will find out that there are exceptions to this principle. But for the rest of this lesson, the root note and first note will be the same.)
Finally the root note sets the key for your music. The key is simply the overall range of your music. If you take your music up or down a step, you have changed key. For example, here is the first line of “Mary had a little Lamb” in 3 different keys. If you play the tune, hum or sing it as well. That will give you a better feel as to how the key varies.


Key 1
1 E |--4--2--0--2--4--4--4---------------------|

Key 2
1 E |--6--4--2--4--6--6--6---------------------|

Key 3
1 E |--8--6--4--6--8--8--8---------------------|

Same tune; 3 different levels.
**A picture to hang your hat on**

If you are a visual person, try this picture. You are in the stairwell of a multi storey building. There is a flight of stairs connecting each floor. As you walk up or down the stairwell you count the steps. You discover that there are 12 steps between each floor. This means that if you start at the foot of one flight of stairs and go up 12 steps, you will be at the foot of the next flight. Or if you start on the 3rd step of one flight, 12 steps later you will be on the 3rd step of the next flight.

This is a picture of our scales and octaves. Step 5 on the 2nd flight and step 5 on the 3rd flight are “octave steps”, and the “scale” is the set of the steps you take (up or down) to get from one to the other. A five foot person might touch down on every step and create a “12 stride scale”. A six foot six walker might only touch down on every second step, and thus create a “six stride scale”. And the bank robber being chased by the police might get from one landing to the next in only two strides. A different kind of “scale” again.

**The major scale**

As we have seen, in theory there are many note patterns that could form a musical scale. However a few special patterns have come to predominate. The major scale is the most important and commonly used pattern in all Western music. So in the rest of this lesson we will learn the basics of this scale pattern, and then finish with some suggestions about further areas to work at.

Start by playing these notes on string 1. Play them often enough so that you can hear the sound of the scale as a whole. At this stage don’t worry about your fingering. Fingering is important, but that is a matter for further study.


1 E |--0--2--4--5--7--9--11--12--|

Now play these notes on string 2...

2 B |--0--2--4--5--7--9--11--12--|

As before, you will see that it doesn’t matter which string you choose. The overall sound of those 8 notes remains the same, because they are in the same proportions to each other. Try the same pattern on the other strings.
Now play these notes...


1 E |--1--3--5--6--8--10--12--13--|

Again, you should hear the same scale sound as before. We didn’t start with an open string, but the first and last notes are 12 frets apart, and the proportions between each note in the scale are once again the same.
Finally, play this set of notes. It is a different scale, created by two small changes in the pattern. By now, you should be able to hear the change in the sound of this pattern and hence know that this is not a major scale.


1 E |--0--2--3--5--7--8--10--12--|

(If you’re curious, you’ve just played an E minor scale!)
What is it that makes a major (or any other) scale? The answer - intervals. The interval between each note in the scale has a certain pattern. Change the pattern, and you change the kind of scale you are playing.

Let’s look at our major scale again. This time we will also record the interval (the number of frets) between each note in the scale.


1 E |--0---2---4---5---7---9---11---12--|
interval 2 2 1 2 2 2 1

or more generally,

note 1 2 3 4 5 6 7 8
interval 2 2 1 2 2 2 1

So all you need to do to produce a major scale anywhere on the guitar is to find your starting note and then play an 8 note scale with this 2-2-1-2-2-2-1 pattern.
**A scale by any other name...**

Our next step is to learn briefly how major scales are named. Because there are 12 frets between the octave notes, there are in fact 12 different major scales. The scale type is the same, but the root note is different in each case. This creates 12 different keys. The first key, and the only key we are going to study in this lesson, is the key of C major. The notes of the scale are named using the first seven letters of the alphabet, like this:


note 1 2 3 4 5 6 7 8
name C D E F G A B C

(Remember that the scale has 8 notes, but the first and last notes are the octave notes. They have the same “essence”, so they have the same name.)
You will recall that there are 12 frets in an octave. However we have only named 7 of those frets by letter. The other 5 frets are named by using the adjacent letters plus a sharp or flat sign. For example, C and D are the first 2 notes of the C major scale, so between C and D there is a 2 fret interval (remember the pattern? 2-2-1-2-2-2-1). So what about the note in between? This note can be named in two ways: C sharp (1 fret up from C) or D flat (1 fret down from D).

The sign for a sharp is a stylised hash symbol (#) and the sign for a flat is a stylised b. So C sharp is written as C#, and D flat is written as Db.

Put all this together and you get the names for every fret in your octave. They go like this:


A
A# or Bb
B
C
C# or Db
D
D# or Eb
E
F
F# or Gb
G
G# or Ab
(and back to A)

If you play all 12 of these notes in a row you have played a special scale known as a chromatic scale.
You can now use these note names to identify the note of every fret on your guitar. For example, the frets on string one are named like this...


1E fret |--0--1--2---3--4---5--6---7--8--9--10--11-12--13-|
name E F F# G G# A A# B C C# D D# E F etc
(Gb) (Ab) (Bb) (Db) (Eb)

...and the frets on string 2 have exactly the same 12 note names, except they start with B rather than E.
You may have questions about all this, such as “Why does this scale run from C to C, and not A to A?” or “Why not 12 letters to name the 12 frets between the octaves?” Good questions. There are answers, but to deal with them we would need a more extensive knowledge of historical music theory and sheet music notation. It’s like asking “why does one culture write left to right, and another culture right to left?”

So for the present just accept that we start with C. In music C could be described as the “default” scale. It’s the only major scale that has no sharp or flat notes added. Every other major scale needs to use at least one sharp or flat to fill in the gaps. This makes the C major scale easiest to learn at this point.

So, C it is. Let’s play this scale on our guitar. There is a C note on string 2, fret 1, so we could play it as follows:


2 B |--1---3---5---6---8---10--12--13--|
note 1 2 3 4 5 6 7 8
name C D E F G A B C
steps 2 2 1 2 2 2 1

Congratulations! You have just learned your first official scale.

**Scale patterns on the fretboard**

So far we have focussed on playing scales on single strings. This is a good way to learn about scales, because you get a better sense of the intervals that you need between the various notes. But to play scales smoothly at speed, we need to use the notes on different strings. We will do this now, using the C major scale as our template.

Remember the essence of a scale - a pattern of notes leading from a starting note to the same note an octave higher or lower. So if we are studying the C major scale we need to know where each C note is on our guitar.

For a guitar using standard tuning the pitch of the open strings is as follows (remember that string 1 is closest to the floor):

String 1 = E
String 2 = B
String 3 = G
String 4 = D
String 5 = A
String 6 = E

So if you know those values, and if you have learned the 12 note names of your chromatic scale above, you should be able to work out the name of any note on any string and fret on your guitar. You may not be able to do it instantly, but that skill will come as you practice. For example, on string 5 the open string is A. Therefore the note at fret 1 is A#. At fret 2 the note is B, and at fret 3 it is C (see the tab below).


1 E |----------------------------------|
2 B |----------------------------------|
3 G |----------------------------------|
4 D |----------------------------------|
5 A |-0--1--2--3-----------------------|
6 E |----------------------------------|
note: A A# B C (C#, etc)

For our second C note we will use the C on string 2. The open string is B, so the C note is on fret 1:

1 E |----------------------------------|
2 B |-0--1-----------------------------|
3 G |----------------------------------|
4 D |----------------------------------|
5 A |----------------------------------|
6 E |----------------------------------|
note: B C (C#, etc)

And so we can play our C major scale across strings 5, 4, 3 and 2, starting at the low C and ascending or the high C and descending. All we need to do is play the same notes in between that make up the C major scale. Here is the C major scale, both ascending and descending:

1 E |--------------------------||----------------------------|
2 B |-------------------0--1---||-1--0-----------------------|
3 G |-------------0--2---------||-------2--0-----------------|
4 D |----0--2--3---------------||-------------3--2--0--------|
5 A |-3------------------------||----------------------3-----|
6 E |--------------------------||----------------------------|
note: C D E F G A B C C B A G F E D C

As you play this scale, try to hear the major scale sound. The notes and the intervals between each note are exactly the same as when you played your major scale on one string.
**A brief detour**

By now you need to start thinking about the fingering for your fretboard hand. Play these 4 notes:


1 E |--1--2--3--4------------------

You could have played all 4 notes by using just your first finger and moving your hand sideways for each note. But a better fingering is to play them with all four fingers, keeping your hand steady, as below.

1 E |--1--2--3--4------------------
finger 1 2 3 4

Your hand at this point is said to be in first position, because the first finger is playing the note on fret 1.
Now play these notes.


1 E |--2--3--4--5---------------

Again, the best fingering is to use all four fingers and keep your hand steady:

1 E |--2--3--4--5---------------
finger 1 2 3 4

In this case your hand is in second position, because your first finger is playing the second fret note. Both sets of notes are identical in terms of finger movements and patterns. The only difference is the positioning of your hand.
In the scales that follow I will add the hand position and fingerings that I use. Feel free to use them or not as you wish.


**Back to C major**

We can expand our C major scale further as we learn more about the notes on our fretboard. In the previous example, we played the C major scale from the C on string 5 to the C on string 2. But in fact there is a C note on each string of your guitar somewhere between the open string and fret 12. As we learn where they are, this opens up possibilites for new ways to play our scales. Some scales will be the same as the one above, but played in a different position on your guitar. Others will be different scales - still a major scale, but covering a different octave.

Here are the 6 C notes:


1 E |--8------------------------
2 B |-----1---------------------
3 G |--------5------------------
4 D |-----------10--------------
5 A |---------------3-----------
6 E |------------------8--------

So using these root notes we can create scales in various positions on our guitar. You have already learned to play the C major scale like this...

1 E |--------------------------|
2 B |-------------------0--1---|
3 G |-------------0--2---------|
4 D |----0--2--3---------------|
5 A |-3------------------------|
6 E |--------------------------|

...but it could also be played like this:

1 E |--------------------------|
2 B |--------------------------|
3 G |----------------2--4--5---|
4 D |-------2--3--5------------|
5 A |-3--5---------------------|
6 E |--------------------------|

The scale is identical. The only change is that you have chosen notes on different strings to create the scale. My suggestion for fingering is to play the first scale in first position (play C with your third finger, D open, E with your second finger, and so on), and the second scale in second position (so you will now play C with your second finger, D with your fourth finger, E with your first finger and so on).
The six patterns that follow are all examples of a C major scale. Each pattern is distinguished by which pair of strings the first and last notes are on.

Pattern 1
From string 5 to string 2
Play in first position (play note 1 with your third finger)


1 E |--------------------------||----------------------------|
2 B |-------------------0--1---||-1--0-----------------------|
3 G |-------------0--2---------||-------2--0-----------------|
4 D |----0--2--3---------------||-------------3--2--0--------|
5 A |-3------------------------||----------------------3-----|
6 E |--------------------------||----------------------------|
Pattern 2
From string 5 to string 3
Play in second position (play note 1 with your second finger)


1 E |--------------------------||----------------------------|
2 B |--------------------------||----------------------------|
3 G |----------------2--4--5---||-5--4--2--------------------|
4 D |-------2--3--5------------||----------5--3--2-----------|
5 A |-3--5---------------------||-------------------5--3-----|
6 E |--------------------------||----------------------------|
Pattern 3
From string 6 to string 4
Play in seventh position (play note 1 with your second finger)


1 E |--------------------------||----------------------------|
2 B |--------------------------||----------------------------|
3 G |--------------------------||----------------------------|
4 D |----------------7--9--10--||-10-9--7--------------------|
5 A |-------7--8--10-----------||----------10-8--7-----------|
6 E |-8--10--------------------||-------------------10-8-----|
Pattern 4
From string 6 to string 3
Play in fifth position (play note 1 with your fourth finger). You will need to move to fourth position for the last 2 notes.


1 E |--------------------------||----------------------------|
2 B |--------------------------||----------------------------|
3 G |-------------------4--5---||-5--4-----------------------|
4 D |-------------5--7---------||-------7--5-----------------|
5 A |----5--7--8---------------||-------------8--7--5--------|
6 E |-8------------------------||----------------------8-----|
Pattern 5
From string 3 to string 1
Play in fifth position (play note 1 with first finger)


1 E |----------------5--7--8---||-8--7--5--------------------|
2 B |-------5--6--8------------||----------8--6--5-----------|
3 G |-5--7---------------------||-------------------7--5-----|
4 D |--------------------------||----------------------------|
5 A |--------------------------||----------------------------|
6 E |--------------------------||----------------------------|
Pattern 6
From string 4 to string 1
Play in seventh position (play note 1 with fourth finger)


1 E |-------------------7--8---||-8--7-----------------------|
2 B |-------------8--10--------||-------10-8-----------------|
3 G |----7--9--10--------------||-------------10-9--7--------|
4 D |-10-----------------------||----------------------10----|
5 A |--------------------------||----------------------------|
6 E |--------------------------||----------------------------|
And there you have it! Hopefully you understand something of what a scale is all about, and can play your first scales up and down your fretboard.


**For further study...**

Scales in music is a huge area. There are lots of good resources on this web site and elsewhere. Here are my tips for other areas you should look at.

1. Work on your fingering.

It’s worth taking the time to learn healthy techniques for both your left and right hands.

2. Develop practice strategies.

There are lots of ideas around. One exercise that I give my students is the “mini scale”. They start with notes 1-3, and when they have mastered those notes, they add one note at a time until they can play the scale:


1 E |--------------------------|
2 B |--------------------------|
3 G |--------------------------|
4 D |----0--2--0---------------|
5 A |-3-----------3------------|
6 E |--------------------------|

1 E |--------------------------|
2 B |--------------------------|
3 G |--------------------------|
4 D |----0--2--3--2--0---------|
5 A |-3-----------------3------|
6 E |--------------------------|

1 E |---------------------------|
2 B |---------------------------|
3 G |-------------0-------------|
4 D |----0--2--3-----3--2--0----|
5 A |-3-----------------------3-|
6 E |---------------------------|

and so on.
Another tip here - make sure that you practice your descending scales as much as your ascending scales.

3. Create other patterns with your scales.

There are many ways you can take the basic scale notes and weave them together in different combinations. Here is one example. It is based on pattern 1 with the “third” notes added (a musical third is 2 notes up in the scale from the previous note. In the scale of C major, C to E is a third; so are D to F, E to G and so on.)


1 E |---------------------------------------------|
2 B |----------------------------0-----1--0--3--1-|
3 G |----------------0-----2--0-----2-------------|
4 D |----2--0--3--2-----3-------------------------|
5 A |-3-------------------------------------------|
6 E |---------------------------------------------|
notes C D E F G A B C
E F G A B C D
4. Explore other kinds of scale.

We have only looked at the major scale here. The arpeggio, pentatonic and minor scales are other patterns that you should try out when ready.

5. Learn to play scales over more than one octave.

By combining your scales you can play music that covers more than one octave. Here is one example to give you the idea. It combines pattern 2 and pattern 5. If you can already play these two patterns, the only detail of technique you need to consider is the fingering when you move from the first octave to the second and back. The shift is between 2nd position and 5th position, and it happens on string 3, so I have given the fingering for each note on that string.


(ascending)
1 E |-------------------------------------5--6--8--|
2 B |----------------------------5--6--8-----------|
3 G |----------------2--4--5--7--------------------|
4 D |-------2--3--5--------------------------------|
5 A |-3--5-----------------------------------------|
6 E |----------------------------------------------|
| 2nd position... | 5th position...
fingering: 1 3 1 3

(descending)
1 E |-8--7--5--------------------------------------|
2 B |----------8--6--5-----------------------------|
3 G |-------------------7--5--4--2-----------------|
4 D |-------------------------------5--3--2--------|
5 A |----------------------------------------5--3--|
6 E |----------------------------------------------|
| 5th position... | 2nd position...
fingering: 1 3 1 3
6. Put your scales to use.

There are of course thousands of ways to do this. One simple idea is to play the melody line of any song using one specific scale pattern. For an example, see “Doe, a deer” from the Sound of Music (I have recently loaded a version of this song onto U-G - choose the chord version, which also has the melody line). You will see that this song uses the 8 notes of a major scale, and to play it smoothly you need to know your scale well. You could take a song like this and learn to play it with each of our 6 scale patterns.

Happy scale surfing!

Written by peterk
http://www.ultimate-guitar.com/lessons/scales/scales_for_absolute_beginners.html


The Importance of Ear Training

I've found that when you limit yourself to playing just scales and focus on the "supposed right/correct way of playing" you are doing just that; limiting yourself. By training your ear to hear what notes sound good, you are becoming a more diverse player because you can play along with anything, even if it doesn't make musical sense.


useful soloing tips, tricks, and tools

Tip No. 1: Microtonal bends

These aren't as complicated as they sound. It simply means that you bend certain notes in a mode/scale slightly out of tune with you finger(s) so that it sounds good. The easiest way to understand this is to hear it, so have a go at the tab underneath this text.

Tab key:-

--4-- = pluck the string shown while fretting the string on the fret numbered

--h6- = hammer-on your finger onto the string on the fret numbered, doesn't require the string to be plucked

--p2- = pull-off you finger from the string shown to sound a note while fretting the string on the fret numbered

-8b9- = luck the string shown while fretting the string on the fret numbered, then bend the string until the note sounded becomes the same as the note sounded on the fret shown to the right of the b. E.g., 8b9 means pluck the string while fretting the string on the 8th fret, then bend the string one semitone/one fret higher in pitch.

-8b9r8- = same a regular bend but allow string to return to regular position on fret numbered; think of b as meaning bend, and r as meaning relax

--t12- = tap on the fret numbered firmly with one of the fingers in your plucking hand

-t9r5- = tap on the fret numbered firmly with one of the fingers in your plucking hand then release your finger from the string either by simply pulling it off or twanging it, but fret the string on the fret numbered to sound that note after the finger tapping the string has been removed

-mb7- = bend the string slightly after plucking the string number shown, but don't bend it so that raises the note in pitch by a fret.

/ = Slide finger(s)up the fretboard to the fret shown

\ = Slide finger(s)down the fretboard to the fret shown

--9v- = use vibrato by wavering the string up and down by bending it to get a sort of wavy sound


E||------------------|------------------||-12-p10---------------------------|
B||------------------|------------------||---------12-p10-/12-12------------|
G||------------------|-mb7--9--mb12--9--||--------------------14b16-mb12--9v|
D||----------5-h7--9-|------------------||----------------------------------|
A||-5h7-mb10---------|------------------||----------------------------------|
E||------------------|------------------||----------------------------------|

This is a typical blues run in minor pentatonic in E. I put in the microtonal bends in the parts that I felt sounded the best, but there are other places for them. Some better than others. You'll notice the the microtonal bends are on the 3rd and 7th notes in the scale if you were using natural minor. They also appear on the 5th note from time to time, but you can bend that note even further. This is how to use that 5th to get a blues flavour in a solo.

E||------------------|------------------||----------------------------------|
B||------------------|------------------||----------------------------------|
G||------------------|------------------||-------7-h9-------7-h9-p7---------|
D||--------7b9r7-5---|--5--7b8r7-/12-14-||-7h8h9------7h8h9---------9p7-----|
A||--7--10---------7-|------------------||-----------------------------10p7-|
E||------------------|------------------||----------------------------------|

You'll probably find that this is much more noticeable than microtonal bends. Whether this is desirable or not is up to you, and you can use either or both. The point is that you can slip both into you solos if you're using the right mode/scale, for example dorian and aolien/natural minor would both be capable of having these tricks added to them. Happier scales will need the notes moving about to the corresponding notes in those scales. E.g., a major scale has a major third so the major third will be slightly bent as opposed to the minor third slightly bend in the minor scale. A major third is one fret higher than a minor third.

Tip No. 2: southern bending

This is simply what I call this technique and it isn't a technical name for it, but it comes up in southern rock like ZZ-top quite a bit.


E||------------------|------------------||----------------------------------|
B||-12------7--------|-8-----10----5----||----------------------------------|
G||-14b16---9b12-----|-10b12-12b14-7b9--||--/mb12---9v----------------------|
D||------------------|------------------||----------------------------------|
A||------------------|------------------||----------------------------------|
E||------------------|------------------||----------------------------------|

This should give you a sort of echoey sound, as the strings being bent to the degree that they are both sounding the same note. This can be done in any mode or scale, but because of the way the strings are tuned, it's much harder to do on any of the other strings in pairs as the notes are further apart on the fretboard. This is good way to break up a solo when you've been using single notes for a while but don't want use a full chord just yet.
Typically featured in blues music, it is also a pretty widespread trick amongst rock guitarists.


Tip 3: Two handed tapping

Made famous by Eddie van Halen and widely mist-understood and overused by guitarists ever since, is has been in use far longer, with Jeff Beck being amongst the earliest tappers. Tapping essentially gets your guitar to leap to notes much higher than one hand alone would be able to accomplish, as well as making solos sound much more outside the box, even though it has now become a clique. The theory behind tapping is that you follow a scale or mode, and literally tap the note you want to hear from the guitar next. This often allows previously inaccessible notes to be exploited, but remember that you have to follow a mode when using it just like regular playing, tapping isn't an excuse for bad theory.


E||------------------|------------------||----------------------------------|
B||------------------|------------------||----------------------------------|
G||------------------|------------------||------------------9-h12-t16r12p9--|
D||------------------|---7-h10-t14r10p7-||--9-h12-t16r12p9------------------|
A||---7-h10-t14r10p7-|------------------||----------------------------------|
E||------------------|------------------||----------------------------------|
Tip 4: The control dials on your guitar

By plucking a note when your volume dial is at zero, then turning it slowly up, you are able to emulate a violin. This is generally what a volume pedal is used for by professionals, but for all of us with less then 17 digits on our pay checks this trick does the job just as well but requires the use of your hand rather than your foot.

Turning the volume up to maximum makes harmonics and all the other notes or your guitar must distinct, and allows all the gain in your amp to be put to use, so rock and metal players will prefer to do this. Turning you volume down gets a more throaty and less sharp sound, sort of Hendrix/Bolin sound or sweet child o mine sort of thing, but generally switching to the rhythm pickup can do this as well. Remember, less volume on the guitar means less gain. Tone is also similar. Turning it up to full is preferable is you want to hear you notes clearly, as turning it down will add a little bit of mud into the sound generally. It depends on what you want from your instrument.

Tip No. 5: ask for help!

ask people what you want to know. I've covered what I think most guitarists will want to know, but if there are any tricks you want me to teach you then let me know. I can't make the perfect lesson for everyone, but you can help me make the best lesson I can for you.

Tip no. 6: Fretboard Mobility

One of the most often repeated mistakes that guitarists can make sometimes happens when they stay in one position on the fretboard too long. You see, each string has different overtones to each note played on it, as the thickness of the strings varies so too does the tone produced. However that is not the main problem being addressed in this tip; it's what happens when you play notes continually over the same group of frets.

It's like choosing your diet. Too much sweet stuff and you'll be sick of it pretty quickly(with no offense to his fans, I'll use Eddie van Halen as an example. Don't get me wrong, 'eruption' was brilliant, but it's been a long silent time since then from him in my opinion), too much blandness and you soon become bored(for example Eric Clapton). The tricky part is finding the right balance. As a guitarist it's important for you not to become stuck in one frame of mind, so looking at guitarists who use a wide variety of techniques is a good starting point(Joe Satriani, Guthrie Govan, Steve Vai, John Petrucci, Paul Gilbert, Steve Morse, and the guitarist's guitarist himself Jeff Beck who plays everything from heavy metal to techno-funk). The whole point of this variation is like choosing a wider pallet of paints to use for a piece of art. You may not use all of them, and you'll almost certainly have some left over at the end of the day, but at least you had all that you needed.

Tab key:-

--4-- = pluck the string shown while fretting the string on the fret numbered

--h6- = hammer-on your finger onto the string on the fret numbered, doesn't require the string to be plucked

--p2- = pull-off you finger from the string shown to sound a note while fretting the string on the fret numbered

-8b9- = luck the string shown while fretting the string on the fret numbered, then bend the string until the note sounded becomes the same as the note sounded on the fret shown to the right of the b. E.g., 8b9 means pluck the string while fretting the string on the 8th fret, then bend the string one semitone/one fret higher in pitch.

-8b9r8- = same a regular bend but allow string to return to regular position on fret numbered; think of b as meaning bend, and r as meaning relax

--t12- = tap on the fret numbered firmly with one of the fingers in your plucking hand

-t9r5- = tap on the fret numbered firmly with one of the fingers in your plucking hand then release your finger from the string either by simply pulling it off or twanging it, but fret the string on the fret numbered to sound that note after the finger tapping the string has been removed

-mb7- = bend the string slightly after plucking the string number shown, but don't bend it so that raises the note in pitch by a fret.

/ = Slide finger(s)up the fretboard to the fret shown

\ = Slide finger(s)down the fretboard to the fret shown

--9v- = use vibrato by wavering the string up and down by bending it to get a sort of wavy sound


E||------------------|------------------||----------------------------------|
B||------------------|------------------||----------------------------------|
G||------------------|---7---9----------||----------------------------------|
D||------------7---9-|----------7/--9v--||---5---h7---p5--------------------|
A||---7---10---------|------------------||----------------/7v---------------|
E||------------------|------------------||----------------------------------|

This is a very basic lick in minor pentatonic in E. It should sound relatively like a solo but still feel like it's missing something. I'm nowhere near a fantastic guitarist so please bear with me if these licks don't suit your playing style

E||------------------|------------------||-12-p10---------------------------|
B||------------------|------------------||---------12-p10-/12-12------------|
G||------------------|-mb7--9--mb12--9--||--------------------14b16-mb12--9v|
D||----------5-h7--9-|------------------||----------------------------------|
A||-5h7-mb10---------|------------------||----------------------------------|
E||------------------|------------------||----------------------------------|

E||--------10-/15-17-|-17b19------------||----------------------------------|
B||-10-/12-----------|-------17-/20-\15-||-p12-\10-h12-p8-------------------|
G||------------------|------------------||----------------9v----------------|
D||------------------|------------------||----------------------------------|
A||------------------|------------------||----------------------------------|
E||------------------|------------------||----------------------------------|

This mini-solo should feel more like a solo as there is more movement along the fretboard. This is kind of what I'm trying to say with this tip. If you want to get the audience's attention with a solo, you need to give them more to be interested in, rather than doing the same thing endlessly. I'm not going to force you to do anything you don't want to though, and all these tips are tips, not rules.
Tip no. 7: Plucking-hand muting

One of the problems I've seen many players have is that they can't figure out how to mute notes successfully so that they can still hear the note but it's slightly muffled; metal players will recognize this as a sort of 'chug' sound.

Look closely at where your hand is muting the strings. If it's too far away from the bridge(where your strings are sort of nailed onto the body. It will look like a metal bar from most guitars near where you're plucking the strings) you will completely silence the note. Keep your hand on the strings and slowly move it back until you hear the sound you're after. his may be slightly harder for guitars with tremolo systems on them.

Tip no. 8: Octave plucking

This is a technique that is scarcely used but is there for those who want to use it. It's a technique that mimics the effect generated by octave pedals by sounding the same note in two different octaves.


E||------------------|------------------||----------------------------------|
B||------------------|------------------||----------------------------------|
G||---9---12--16-----|--14---7---9------||----------------------------------|
D||------------------|------------------||----------------------------------|
A||---7---10--14-----|--12---5---7------||----------------------------------|
E||------------------|------------------||----------------------------------|

This is an example of this technique in a lick. Keep in mind that this will almost certainly require fingerpicking or hybrid picking to be pulled off correctly. It's definitely good practice for people looking into that style of playing. Breaking up the monotony of a solo with this would be how I would use this, as it's hard to work this technique into a riff, usually.
Tip no. 9: Making Chords Into A Solo

This isn't impossible. Find some chords that you think fit pretty well into a solo, and then see where they should go. This is an excellent way of making a solo sound thicker, and if you want an example of how this is used look into Jimi Hendrix playing All along the watchtower. There's a funk guitar bit right in the middle of the solo, but because of where it is it still fits. Blurring the line between rhythm and lead isn't a bad idea, but it strongly enforces the melody of the song.

What this means is that if you're playing something with a strong melody like 'all along the watchtower', it will sound good. However if you're playing something much more riff-based like 'blackened' or 'the thing that should not be' by Metallica, it probably won't work. It's more reluctant to fit into songs with more notes in their riffs as then all the notes in the chords have to be in the scales or modes that you're playing in. It's a tough theory to crack as it's soloing and chords blurred into one, but look for lessons on it and It is a very good trick to have in your pocket.

Written by LeoKisomma
http://www.ultimate-guitar.com/lessons/soloing/tips_for_guitarists_soloing_secrets.html


Tuesday, February 22, 2011

Common Music Related Vocabulary

scale - A group of notes that work well together

chromatics - These are basically all twelve (12) notes in an octave. The naturals (7) and non-naturals (5) together make up the chromatics. (7+5=12).

naturals - The notes that do not have sharp or flat names (A, B, C, D, E, F, G). There are seven (7) of them.

non-naturals - The notes that do have the sharps or flats in their names (A#, C#, D#, F#, G#). There are five (5) of them. These notes are also often called the "accidentals".

octave - In traditional music there are only 12 different notes, then they repeat themselves. When you move up or down 12 notes, you will find a higher or lower version of the note you started on. This is an octave. Same note, but one octave higher or lower.

sharps - Sharp generally just means higher. Sharp of the note you are on would be one note higher. To tune sharp you would tune "up".

flats - Flat generally just means lower. Flat of the note you are on would be one note lower. To tune flat you would tune "down".

major - This is a type of scale or chord that sounds bright, happier, and more upbeat. It has no flats in it. This is kind of subjective, and will be explained much more in-depth in the lessons.

minor - This is a type of scale or chord that sounds darker, maybe more sad, kinda gloomy. Minor scales or chords do use flats. This is kind of subjective, and will be explained much more in-depth in the lessons.

root-note - This is basically the same thing as "key". The root note is the note that the music is centered on or built from. You could say its the "main note" in a song.

transpose - Transposing to another key or root simply means to move our scale, etc to another key or root note. It will be the same scale, etc. but now centered on a different key.

position - This would be the four frets that your hand is over at any given time. You have four fingers, one for each fret. Position also refers to the pattern of notes you would play at any four frets for your chosen scale, etc.

fret - Technically, the frets are the small metal bars across the neck of your guitar or bass. When you press your fingertip down between two "frets" you will fret the string and make the appropriate corresponding note. (you do not actually press your fingertip down "on" the frets, but between them)

interval - This is the space between notes. (see whole-step and half-step)

half-step - This is the shortest interval. It is the next note up or down from where you are. For guitar and bass players, this would simply be moving up or down one fret.

whole-step - This is a longer interval than the half-step. With a whole-step you would skip a note and play the second one. For guitar and bass players you would simply "skip a fret" up or down.

pentatonic - This is a type of scale using five different notes. Penta means five and tonic means tone. So a pentatonic scale is a "five tone scale".

mode - If theory is learned properly, the meaning of this would be different, but this term generally applies to a group of seven note scales.

melodic-interval - A single note.

harmonic-interval - Two notes at a time.

chordal-interval - Three or more notes at a time.

barre - The use of your index finger to hold down more than one string at one fret in a single chord, in order to build chords with that fret as the "nut".

barre chord - A guitar chord in which your index finger barres all strings at one fret, and the rest of the chord is built using that fret as the nut. For example, in an F# chord, the index finger barres the second fret, and the other three fingers make an E chord using the second fret as the nut.

bass note - The lowest note played in a chord, shown either by the chord name (e.g. E in E) or the note listed after a slash (e.g. F# in G/F#).

chord - Three or more pitches played simultaneously, usually a root, third, and fifth, though sometimes a seventh is added.

circle of fifths - A musical tool showing the relatedness of keys.

closely related keys - The fifth up and fifth down (fourth up) from any key. For example, the keys closely related to G are C (fifth down) and D (fifth up).

diminished fifth - An interval made up of two whole steps and two half steps. For example, the distance between D and Ab is a diminished fifth.

diminished chord - A chord consisting of a minor third and a diminished fifth. For example, a D diminished chord (D?) contains D, F, and Ab.

dominant - The fifth note of the major scale. The major chord built on the dominant, designated V, leads strongly toward the tonic.

fifth - In a scale, the distance between a certain note and another note four notes above it. The certain note is counted as I, the note four notes above that is V.

half step - The smallest recognized interval in Western music. The distance represented by one fret on a guitar is a half step.

interval - The musical distance between two notes, measured by the number of whole and half steps between the two notes.

inversion - The use of notes in the chord other than the root as the bass note (e.g. F# bass in a D chord).

key - The basis of musical sounds in a piece. Each key uses the notes and chords of the corresponding major scale. The key is named after the tonic (e.g. the tonic in the key of A is A).

leading - The tendency that certain notes and chords have to resolve to other specific notes or chords.

leading tone - The seventh note of the major scale, one half step below the tonic. This note leads strongly toward the tonic.

major chord - A chord consisting of a major third and a perfect fifth. For example, a D major chord (D) contains D, F#, and A.

major scale - A group of eight notes with the following whole step/half step pattern between them: W-W-H-W-W-W-H. For example, the A major scale consists of A, B, C#, D, E, F#, G#, and A.

major seventh - An interval made up of five whole steps and one half step. For example, the distance between D and C# is a major seventh.

major third - An interval made up of two whole steps. For example, the distance between D and F# is a major third.

minor chord - A chord consisting of a minor third and a perfect fifth. For example, a D minor chord (Dm) contains D, F, and A.

minor seventh - An interval made up of four whole steps and two half steps. For example, the distance between D and C is a minor seventh.

minor third - An interval made up of one whole step and one half step. For example, the distance between D and F is a minor third.

modulate - To change keys.

muting - Pressing your finger against a string while playing a chord to avoid playing that string. Muting is represented by an x in my chord diagrams (as in E/G#: 4x2400).

perfect fifth - An interval made up of three whole steps and one half step. For example, the distance between D and A is a perfect fifth.

resolve - A musical progression which brings finality to part of a piece.

root - The note a chord is built on.

seventh - In a scale, the distance between a certain note and another note six notes above it. The certain note is counted as I, the note six notes above that is vii.

seventh chord - A chord consisting of a major third, a perfect fifth, and a minor seventh. For example, a D seventh chord (D7) contains D, F#, A, and C. Major seventh chords (notated maj7) contain a major seventh instead of a minor seventh.

suspended chord - A chord containing either the root, second, and fifth (sus2), or the root, fourth, and fifth (sus4).

third - In a scale, the distance between a certain note and another note two notes above it. The certain note is counted as I, the note two notes above that is iii.

tonic - The note on which the major scale is based. The major chord built on the tonic, designated I, is the eventual goal of any song.

transpose - Moving the musical position of a piece, keeping all intervals as they were in the original piece. For example, if you have C, F, and G (I, IV, and V), and you want to transpose to the key of G, then use the I, IV, and V of G, which are G, C, and D.

http://www.all-guitar-chords.com/guitar_chords_glossary.php


Explaining the Guitar Neck and Fretboard For Beginners

Explaining The Guitar Neck Diagrams
For those of you who are not used to reading these types of illustrations or diagrams I thought I would include some explanation on them. I usually draw a standard guitar neck diagram that would appear the same as it would when you look down at your guitar or bass neck. What you will see when looking at the diagram below is the "low E" string (the fattest one) on the bottom, and the "high E" (the thinnest one) on top. This should be easy to tell as the string sizes are visible on the neck. If you have not yet memorized the string names, they are listed right here and now would be an excellent time to do so.

^ Neck Diagram ^

In actual diagrams, you will see dots on the fretboard marking where the notes should be played. They will be in various colors and will mean various things.

Also, if you see note markers that are all the way at the end of the neck, and are not in between frets where you would put your finger, but rather right on the "nut" at the end, these are "open" notes and do not need to be fretted at all.

* note for bass players: Bass players can use the exact same diagrams as the guitar diagrams, using only the bottom four strings (low E, A, D, G). This means that everything is the same for bass, you would just ignore the B and High E strings. (this can change for 5 string basses, etc)

http://www.theorylessons.com/basics002diagrams.php


Melodic Control - how to play a better solo/lead

Soloing can be a very difficult task at first. For me, I found this video extremely helpful in understanding all of the various notes I can hit and how I can string them together to form solos with more distinct melodies in them.


Jimi Hendrix Rhythm Guitar Techniques


Jimi Hendrix was an incredibly innovative guitar player. He utilized techniques such as those demonstrated in this video in order to play new things that not many other guitarists play. He made his style unique and expressed his creative thought process instead of simply playing in a way that others would view as "correct". By putting these techniques into your playing, fluidly playing in various techniques around the fretboard should become more clear.

ROCK ON Jimi \,,,/_


What Are Time Signatures?

For those of you who don't know, a time signature is represented by a fraction. You've probably looked at some sheet music and saw the fraction 4/4 at the beginning of the peice. That is a time signature.
4   < the numerator shows how many beats are in the measure
-
4   < the denominator shows what type of note gets the beat

The numerator is pretty easy to understand, but the denominator might get a little confusing. When I say "what type of note gets the beat," I'm talking about note values such as quarter notes, eighth notes, sixteenth notes, and so on. A quarter note will be represented by a 4, a half note will be represented by a 2, a whole note by a 1, an eighth note by an 8, a sixteenth note by a 16, and they usually won't go up any higher than that.
So, that being said, you should be able to understand what is meant by these time signatures.
4     4     4     4     4     
-     -     -     -     -
1     2     4     8     16

In the time signature 4/1 you will have four whole notes in a measure.
In the time signature 4/2 you will have four half notes in a measure.
In the time signature 4/4 you will have four quarter notes in a measure.
In the time signature 4/8 you will have four eighth notes in a measure.
In the time signature 4/16 you will have four sixteenth notes in a measure.
Changing the numerator will change the number of whole, half, quarter, eighth, or sixteenth notes that can appear in the measure.
Just to clear up a bit of confusion that I might have just caused, you can use notes other than the ones specified by the time signatures. For example, in a measure of 4/4, you don't have to stick to just quarter notes, you can use eighth notes or half notes or quarter notes. This is where you will have to do a little math. If you wanted to use eighth notes, you can use 8 in a measure of 4/4 because eighth notes are half the value of a quarter note. This can all get very confusing, so here is a chart to help explain.
1 Whole note = 2 Half notes = 4 Quarter notes = 8 eighth notes = 16 sixteenth notes
Maybe it's not a chart, but it is a short tool to help you learn note values. I would go further into detail with it, but this is a lesson on time signatures, not note values.
So, now that you have a basic understanding of time signatures, it's time to learn how to count them. To count a measure of 4/4, you can count like this: 1, 2, 3, 4. Simple. That is what most of today's(and a lot of yesterday's) music sounds like. Listen to any pop song on the radio and you can feel the beat. You can count along with it, 1,2,3,4.
Remember! When you count the time signatures like this, you will accent the 1.
Let's move on to something a little more unusual: 5/4. This is a very simple time signature but can be hard to play at first. You would normally count 5/4 like this: 1, 2, 3, 4, 5. That is the normal way to count it, however, you can count it like this: 1, 2, 1, 2, 3. As long as there are 5 counts of quarter notes in it, you will be fine.
Now we can try a more simple and more "normal" time signature. 3/4 is very popular in waltz music. It is counted: 1, 2, 3. Very simple.
Here's one of my favorite time signatures of all, 7/8. In this time signature, you will be counting eighth notes. There will be seven eighth notes in each measure(or the equivilant of 7 eighth notes). There are several ways to count this so here are a few:
1, 2, 1, 2, 1, 2, 3

1, 2, 3, 4, 1, 2, 3

1, 2, 1, 2, 3, 1, 2

1, 2, 1, 2, 1, 2, 1

1, 2, 3, 1, 2, 3, 4

1, 2, 1, 2, 3, 4, 1

As you can see, when you get to the larger numerators there are several ways to count the time signatures. Keep in mind that just because you're playing in 7/8 that does not mean that 7/8 will always be faster than 7/4, the speed will always be dictated by the tempo.
Time signatures are taught more to percussionists than to guitarists but they can be just as useful to us.
Like most music theory, you must physically practice this on your instrument. So the big question is, "How do I go about practicing time signatures?" It's very simple, you will only use one chord or note, we'll just say you can us the standard E5 power chord
--------
--------
--------
--------
--2-----
--0-----


and play the notes in the time signature. Count 1, 2, 3, 4 and play the E5 each time you count, making sure to accent the 1. Make sure that you're consistant with the notes as well, you don't want to play the 1 and hold it longer than the 2, 3, and 4.


written by ironwolg
http://www.ultimate-guitar.com/lessons/the_basics/time_signatures.html

The Circle of Fifths

All scales come from 1 main scale, which is the major scale. In scales, there are a certain number of sharps and flats. You can use the circle of fifths to: read how many sharps and flats there are in a scale, to help you better make and play scales, understand scales better, and build more scales. This is a very important topic, so if you don’t about it yet, READ THIS! It will really help you with learning new songs, writing songs, and improvising/soloing. Gb = G Flat, incase you didn’t know (which you should)


This is the Circle of Fifths. It is used to build all sorts of scales. It may look confusing at first, but it is actually very simple to use. So let’s first take a look at the C Major Scale:
C D E F G A B C

As you can see it has no sharps or flats, so you call the C Major Scale Natural (natural means it has no sharps or flats). Now let’s take a look at the G Major Scale:

G A B C D E F# G

G major does have 1 Sharp. You may not have known this, and may be wondering how to figure it out. That’s were the circle of fifths comes in. All the notes Clockwise to C are Sharp. All the notes counter-clockwise to C are flat. So when we look at G, it is 1 away from C when looking at it clockwise, so it has one sharp note. D is 2 away from C, so D Major has two sharp notes. A Major has 3 sharp notes, and so on. Starting to make sense now?

Now let’s take a look at the other side. Finding out the Flats on that side are the same as finding how many sharps are in a scale on the other side, except you’re going to count counter-clockwise. For Example, to find how many Flats are in F Major, since F is 1 away from C, going counter Clockwise, F major has one Flat note. B flat Major has 2 flat notes, and so on.

So now that you know how to figure out how many sharp and flat notes are in a scale, it’s time to learn what those notes are. To do this, we use a simple “Formula”: FCGDAEB. You can make up some kind of words to memorize it, such as Father Christmas Gave Dad An Electric Blanket. Whatever you do to remember it, just remember. So what you do with it though, is count how far a root note of a scale is from C again, for example, D is 2 away from C. Then you count that many of the letters from our formula thing earlier, which was FCGDAEB. So the first 2 letters of that are F and C. That means that F and C are the only sharp notes in that major scale. Another example would be E Major. It is 4 away from C, so it has 4 Sharp notes. Those sharp notes are the first 4 notes of the group of letters, FCGDaeb. So F, C, G, and D are the sharp notes in E Major. All you have to do is take the number of however many notes are sharp in a scale, and count that many of that number in the group of letters.

Finding out the flat notes of the other scales on the other side are the same thing, but in reverse. Since we count the letters in reverse when finding out how many flat notes are in the scale, we use the “formula” backwards, making it BEADGCF. Let me give you an example: B flat is 2 away from C when counting counter-clockwise, so you use the first 2 letters of the backwards formula, showing you that B and E are the flat notes in the B Flat Major Scale.

Also note that F# is also Gb, B is also Cb, and Db is also C#, as you can see above.

written by gods guitarist
http://www.ultimate-guitar.com/lessons/scales/the_circle_of_fifths_explained.html